
The Secrets That No One Told You About When Using Cement All
Have you ever found yourself questioning why your concrete creations didn’t turn out the way you though they would when working with Cement All? In this blog post, I’ll unveil some transformative tips that you can immediately apply to enhance your skills in crafting concrete candle jars.
Which Cement All Should I Use
 Home Depot is the main big box store that sells Cement All but like every product on the market there are a few different mixes. Let’s break down the trio: Mortar Mix, Concrete Mix, and the star of the show, Cement All.
Starting with Mortar Mix, it’s tailored for masonry work. With a moderate setting time, it allows for precise placement and adjustments, ensuring a strong bond in mortar joints. Perfect for those projects that require attention to detail.
Next up is Concrete Mix, your go-to for general purposes. This fast-setting mix is designed for a variety of projects, boasting a quick setting time within an hour. It provides decent strength, making it versatile for a range of applications.
Now, let’s shine the spotlight on Cement All. This is where the magic happens. It’s a top-notch concrete repair material with a rapid setting time of around 15 minutes and impressive compressive strength, making it ideal for structural repairs. And here’s the key – compressive strength. We all want our crafts to be sturdy and durable, especially when they’re destined to be handled frequently.
In fact, the final cured PSI of a Cement All vessel is a whopping 9000, surpassing its counterparts by 3000. That’s the kind of strength we’re talking about – ensuring your creations stand the test of time.
One standout benefit of Cement All is its quick-setting time. While it sets in just 15 minutes, it doesn’t mean it’s ready for use. Instead, it begins to take shape, gradually hardening and strengthening over time. The result? A resilient and reliable final product.
If you’re heading to Home Depot to grab your Cement All, make sure to pick up the one in the blue bag – not green or brown. This blue bag contains the powerhouse mix you need for your concrete creations.
Storing & Caring for Your Cement All
 Keeping Cement All in a cool, dry spot may feel like a repetitive mantra—cool, dry, we get it. But let me tell you, there’s a solid rationale behind this familiar advice!
You see, Cement All doesn’t vibe well with extreme weather. If it’s freezing, moisture might sneak into the mix, causing it to freeze, expand, and potentially crack. On the flip side, high temperatures can fast-track the setting process, making the material harden prematurely. Not cool.
So, to keep your Cement All game strong for your construction or repair projects, put it in a cool and dry spot. Simple as that.
And here’s the thing: aim for 60 to 80 degrees. Oh, make sure you put your Cement All into a plastic container to protect it from dust, bugs, and any unexpected water surprises.
Here’s another thing. When I grab a bag of Cement All from Home Depot, I’ve got my trusty $12 container in tow. Right there in the parking lot, I slice open the bag, dump the Cement All into my container, and seal it up tight. Why? I’m not into having Cement All dust going all over my workspace. Safety first!
After putting the lid on top, I give it a good shake, mixing things up before I start creating.
But hold up, let’s talk safety. Cement All’s recipe includes CSA cement and silica sand. Now, silica sand can be a bit of a troublemaker. When you start mixing, it can get dusty real quick. Inhale that stuff, and you’re looking at serious health risks like silicosis – not a fun ride.
That’s why I rock a respirator. Actually, I have two – a half respirator for when I don’t want to ruin my hair, and a full mask when I’m going all-in.
Here is the half respirator I use and here is the full face mask.
Silicone Bowls
 If you’re serious about making concrete candle jar or concrete creations, these silicone bowls are an absolute game-changer.
They’re incredibly practical and user-friendly. All you need to do is pour your mixture into the bowl, give it a good mix, and squeeze the silicone to guide your pour. Plus, cleaning up is a breeze.
I’ve even got a video tutorial on how to easily clean these silicone bowls, just in case they get stained from pigments. Once I’m done pouring, I let any leftover contents harden, crack it off, and wipe down the bowl. It’s as simple as that.
Check it out for yourself. I’ve used these bowls for various colors, additives, paints, and dyes, and they still look brand new.
Silicone Mats
 Cement All can get messy and dusty, no matter how careful you are during the mixing and pouring process. Dealing with the aftermath can be tricky, but here are three methods.
Firstly, wiping it up immediately can be a bit dicey, especially if your mixture has color in it, as it might leave streaks.
The second method involves letting it harden and then chiseling it off once it’s dry. But beware—chiseling off a super-stuck mixture can lead to unexpected ricochets, making the cleanup process even messier.
The third and, in my opinion, the best way is to use a silicone mat. If your mixture happens to spill onto the mat, cleaning it off is a breeze. No stubborn sticking, no colorful residue—just a simple wipe-off.
Trust me, investing in these silicone bowls and mats is a decision you won’t regret. They make the whole concrete crafting experience a whole lot smoother.
How to Mix Cement All
Mixing Cement All (CA) can either be right or wrong, and let’s be honest, many of us have been doing it wrong since day one.
The wrong method? Pretty straightforward. You toss your CA into a bowl, slosh some water on top, vigorously stir like there’s no tomorrow, and then pour it into your silicone mold. But surprise, surprise—it doesn’t turn out the way you envisioned. Cue the disappointment: “Oh, it’s so ugly!”
Now, the right way is a whole lot simpler and puts you firmly in control. Start by gracefully placing your water into the silicone bowl. Then, with finesse, add your CA on top. Let them mix together like a perfect dance, fall in love, and harden.
Okay, maybe the love analogy was a bit much.
But here’s the deal: by adding your mix to your water, you reduce the chances of dust flying everywhere, and you ensure a much smoother pour after mixing. The added bonus? Your creations come out with smooth bottoms. Nice and polished.
Now, let’s talk ratios. Cement All operates on a 4 to 1 ratio. Imagine it like money—1 dollar represents your 4 parts of CA, and 1 quarter is your 1 part of water. Still following? Good.
Here’s the crucial part: too little water, and your concrete creation might end up brittle, breaking apart like a potato chip. On the flip side, too much water, and your creation might not set properly—something you’ll notice when you demold your mushy masterpiece. So, aim for that sweet spot to achieve concrete perfection.
Using Pigments, Paints or Dyes
 If you’re diving into the world of pigments for your concrete creations, here’s a golden rule: for optimal results, mix the pigment with the water first, and then add your contents into the water.
Why? Because this method ensures a more even and vibrant distribution of color. Trust me, it makes a noticeable difference.
Now, if you’re leaning towards using acrylic paint, go ahead and introduce it once the mix is well underway. Just a heads-up: too much acrylic paint can thicken your mix and make it a bit tricky to stick together.
And for the Rit Dye enthusiasts out there, you’ve got options. Check out the video for more details, but here are two methods: either add it to your mix or add your vessel to dyed water after it’s all cured.
Regardless of your chosen color additive, stick to the best practices for top-notch outcomes. Each of these methods is unique, so resist the urge to mix and match their techniques.
Now, here’s the one thing you can’t forget: the 5% rule. Best practices dictate that you should aim to add up to, but not more than, 5% of your colorant to achieve the desired effect.
Confused? Let’s break it down. If you’ve got a 4 to 1 ratio with Cement All and you’re adding, say, 400 grams of CA and 100 grams of water to your mixing bowl, you want to cap your colorant at 5% of 400.
What’s 5% of 400, you ask? It’s 20 grams. Yes, you got it—no more than 20 grams. Beyond that 5%, you risk compromising the integrity of your creation. So, stick to the golden rule: no more than 5%!
Marbling
 When it comes to marbling your concrete creations, the options are endless: acrylic paint, pigment powder, or Rit dye. But just like any coloring technique, marbling has its own set of best practices.
Let’s break it down:
1. Acrylic paint: You can add acrylic paint directly to your Cement All mix for stunning marble effects. If you prefer not to mix paints into your blend, you can apply acrylic paint after your vessel has cured to achieve that classic marble look.
2. Pigment powder: Mix pigment powder with water and swirl it into your mix for beautiful marble effects. Alternatively, you can create two different colored mixes and blend them together for a unique marble appearance.
3. Rit Dye: Treat Rit Dye similar to pigment powder by adding it to your mix, swirling it around, and presto—instant marble magic.
Now, here’s the important bit: as tempting as it may be to go wild with color and marbling, remember the golden rule—the more color or additive you introduce, the weaker your mix becomes.
So, always keep the 5% rule in mind to maintain the integrity of your creation.
After Mixing Cement All Let it Settle for a Minute
After you’ve finished mixing your Cement All, there’s that undeniable eagerness to fill up that silicone mold—it’s like an addict seeking their fix. But hold on, my friend, take a breath, and let your mix have a moment.
Why?
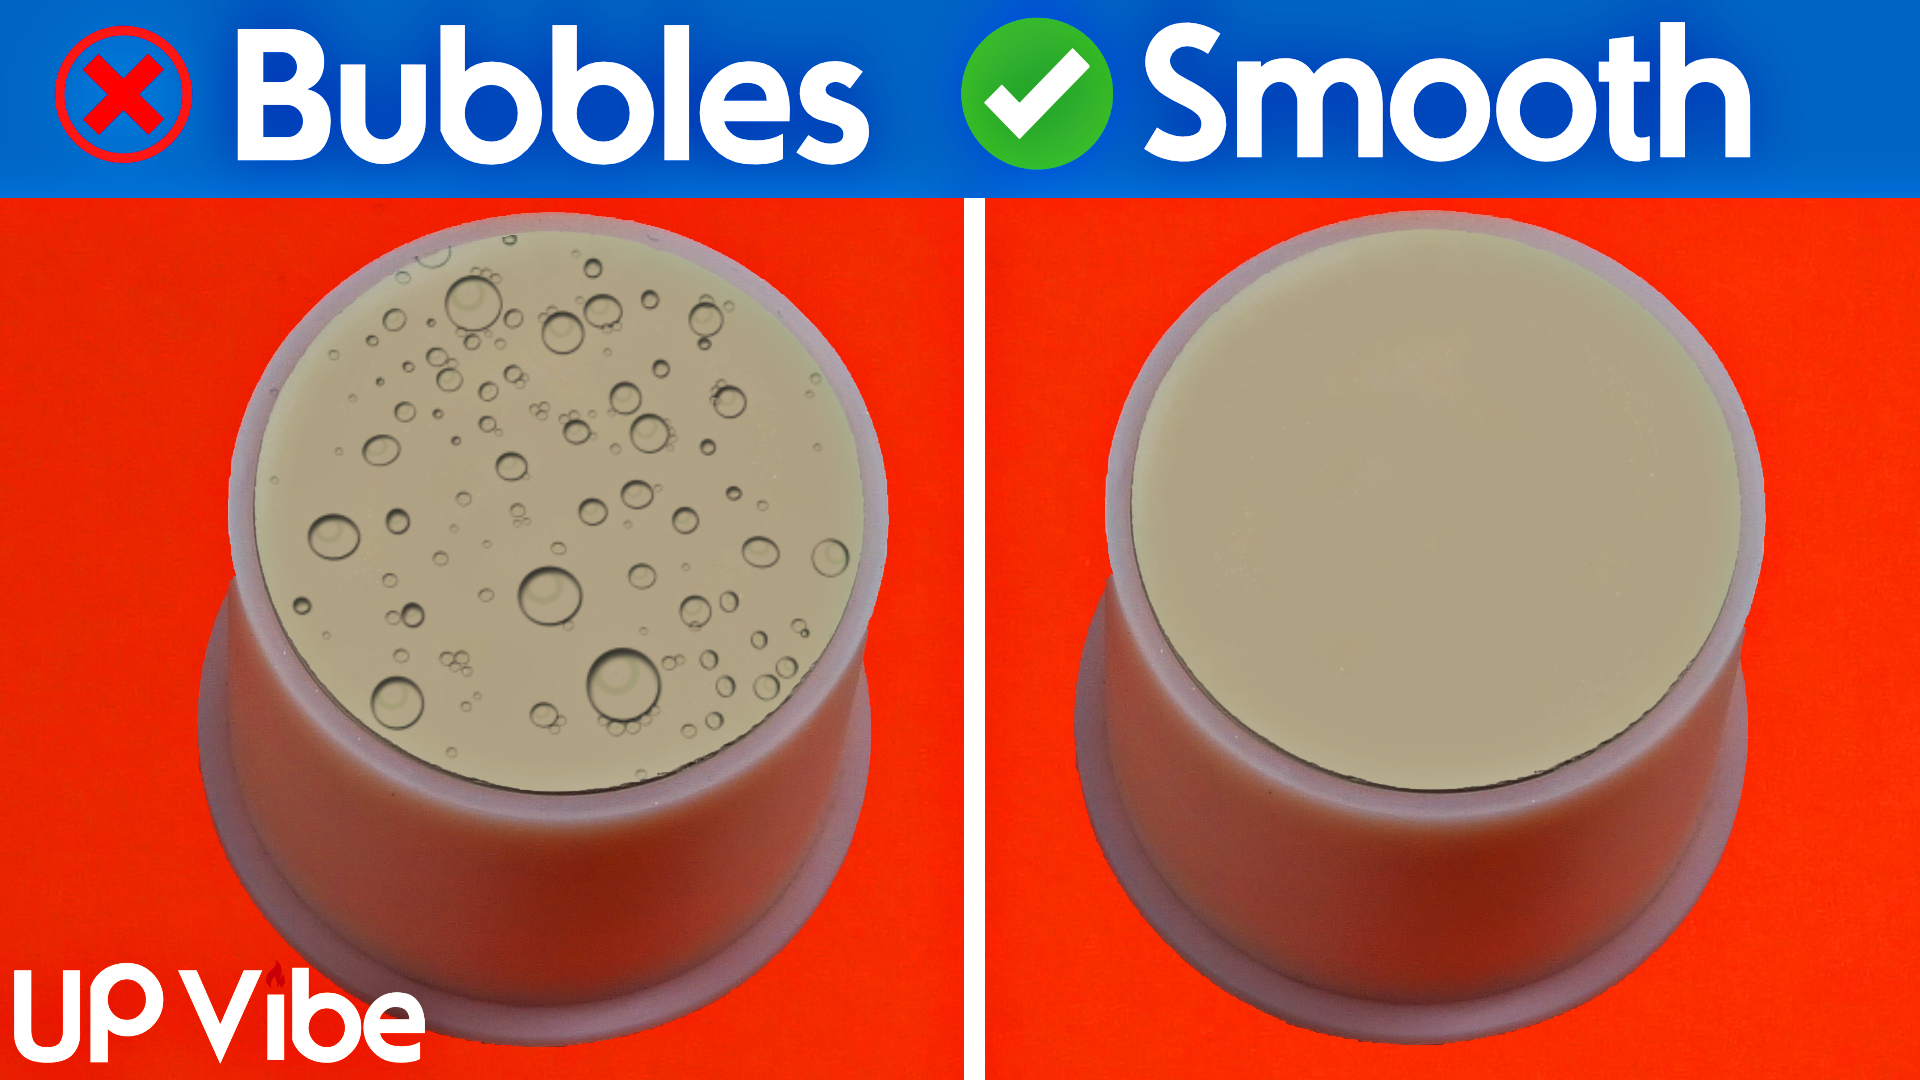
Well, when you’ve thoroughly stirred your mixture, bubbles inevitably form. The air trapped in the mix causes these bubbles to appear. Now, here’s the secret: those bubbles want to pop and not create a disruptive barrier in your creations.
So, resist the urge to pour right away. Give your mix a minute to settle, allowing those initial bubbles to rise to the surface and pop themselves out of your creation, leaving your work bubble-free forever.
If you dive into pouring immediately, you might find a bunch of bubbles stuck in the silicone mold, especially at the bottom (which is actually the top when you demold it). These trapped bubbles, without a chance to pop, might gather around the opening of the jar, giving it a less-than-ideal, shall we say, “bubblicious” appearance. So, let your mix breathe, and your creations will thank you for it!
Silicone Molds
 Okay, without stating the obvious, let’s get real: Cement All gets hard when it hardens. Captain Obvious reporting for duty, right?
But here’s the thing, and hear me out—it’s crucial. You definitely don’t want a silicone mold that’s as tight as a drum when your concrete creation hardens. Why? Because demolding can turn into a serious workout, especially if you’re dealing with more than just a handful of vessels.
I’m not kidding. Demolding a bunch at a time can be a real challenge. I’ve been there, demolding 10 or so vessels simultaneously, and by the time I hit number 8, my fingers were practically on strike. Demolding might not be an issue when you’re young and full of energy, but as time goes by…
Smile! Okay, jokes aside, it can actually be strenuous and, when you’re older, potentially risky.
So, what’s the solution? My best advice: opt for softer silicone molds that haven’t compromised on quality. And where can you find these gems? Well, the top pick on my list is Boowan Nicole’s silicone molds.
Why? They’re soft, making demolding a breeze. You could probably demold 20 or 30 and still have the feeling in your hands to demold more. Plus, Boowan Nicole’s molds often come with support braces, ensuring the mold maintains its shape through multiple uses.
If you want to check out Boowan Nicole’s easy to demold silicone molds please click here.
How to Pour to Avoid Bubbles
Alright, buckle up because I’m about to spill the beans on how to pour Cement All into a silicone mold without those annoying bubbles. Assuming you’ve mixed your Cement All properly, here are three game-changing tips to keep those unsightly bubbles at bay.
Firstly, and I know it might not sound groundbreaking, but you must pour your mix into the silicone mold slowly. I can already hear some saying, “Thanks, Captain Obvious,” but hold on. Pouring slowly is like the unsung hero—it helps maintain the mixture without introducing extra bubbles that would inevitably form if you were to pour in haste.
Now, I get it. Pouring slowly might not win any innovation awards.
But, I promise I have better tips. However, let me finish my thought first!
Pouring slowly is crucial because the faster you pour, the more air gets trapped inside. Now, onto the more exciting stuff.
The second trick: pour about a quarter of your mixture into the silicone mold, then give the bottom a gentle squeeze. If you have a lid, use just enough to swirl it around and wet the sides before continuing. This nifty move helps eliminate air pockets and ensures a smoother pour.
And now, the third and somewhat magical tip: use a heat gun on the top of your mixture right after pouring. When you hit your freshly poured Cement All with a heat gun, the heat causes the air and moisture within the mix to expand. This expansion leads to the release of trapped air bubbles, making them pop or burst.
But here’s the secret sauce: don’t go overboard with the heat gun. Lightly pass it over the top, and voila—no more bubbles. Your creations will thank you for the bubble-free treatment!
Demolding Times
 Here’s a little demolding hack for you: the usual waiting time is around 3 hours, but there’s a way to speed up the process.
Now, the actual demolding time can vary based on your location and the ambient temperature, but here’s the trick: each time you demold, shave off 5 minutes from the previous time. So, if you initially demold something in 3 hours, the next time aim for 2:55, then 2:50, and keep reducing by 5 minutes each time.
Continue this process until you notice your creation starting to break. When that happens, add back 5 or 10 minutes for safety, and voila—that’s your optimal demolding time for that particular silicone mold.
Based on my research, I’ve managed to demold my Cement All creations in just 2 hours and 20 minutes. That’s a whopping 40-minute time savings!
Now, keep in mind, if your creation is on the thicker side, you might have to wait a bit longer. However, on average, a concrete candle jar can be demolded much faster than the standard 3 hours. So, play around with the timing and find the sweet spot for quicker demolding without compromising the integrity of your awesome creations!
Water Bathing
 Welcome to the thrilling new game show, “Dunk or Debunk” – the ultimate water-bathing game show where contestants navigate through a sea of misinformation to separate facts from the waves of lies!
Now, seriously, asking someone else if you should water bathe your concrete creations is like asking your next-door neighbor if you should go to bed earlier. The truth is, only you can answer that question.
Here are the facts: Water bathing is actually recommended by Cement All. On the package, it clearly states, “Water cure all RS Cement All installations by keeping exposed surfaces wet for a minimum of 1 hour.”
However, here’s the catch—most of our concrete creations are covered in silicone, or at least the majority of them are. So, in reality, many of us don’t need to water bathe our creations. But, and this is where the misinformation creeps in, some still believe they should do it just because others are.
The best way to know for sure? Test it out. Climate plays a significant role—some live in warm climates, while others face freezing temperatures. Each climate will yield different results, so test your creations accordingly.
If you have the luxury of controlling your temperature, set it at normal everyday temps between 65 and 70, and you most likely won’t have to worry about water bathing. For a more detailed breakdown, check out the video on water bathing here. .
Curing
Knowing that your concrete creation needs to cure is a significant step in the process. For those who might not be familiar, let me quickly break it down for you.
Concrete needs to cure because it undergoes a chemical reaction when water is added to the mix. This reaction helps bind the ingredients together, forming a strong and durable material. Curing is the process of keeping the concrete moist and at the right temperature, allowing this reaction to continue over time.
Without proper curing, the concrete won’t reach its full strength, making it more prone to cracking and less reliable for our creative purposes. It’s important to note that concrete hardens due to hydration, not simply because it dries.
Now, when does the curing process end? Or, better yet, how long does it take for a concrete candle jar to cure?
On average, concrete takes about 28 days to cure, but for our purposes, we don’t necessarily need to wait that long. To determine when your concrete creation has lost most of its water weight and is cured enough to move on, you can weigh your vessel daily starting from the day you demold it.
For example, if a vessel starts out weighing 315 grams and after 3 days it weighs 289 grams, then on the 4th day it’s 288 grams, and on the 5th day it fluctuates between 288 and 289 grams, that indicates the vessel has lost enough water for you to proceed.
Additives
 If you’re eager to add some extra flair to your concrete creation after it’s fully cured, let me guide you on the best approach, especially when using Cement All.
Before sealing your concrete candle jar, you might have plans to embellish it with gold foil, paint, or perhaps a label like a transfer label. The key here is to wait until your vessel is fully cured before adding any additional elements. Trying to add stuff on a vessel that still has water inside can complicate the curing process and make it harder for the additions to adhere.
Let’s assume your vessel is fully cured and ready for enhancement, say, with gold foil. You can either use a glue specifically designed for foil or opt for a sealer like Earth Safe Finishes, which not only acts as a bonding agent but also aids in the foil attachment. It’s important to note that at this stage, we’re not sealing; we’re simply adding the foil.
Now, you might wonder why you can’t add your gold foil directly to the silicone mold, as seen on the internet. Well, when using Cement All, there’s a mysterious phenomenon— it absorbs the foil, and you only realize it’s missing once you demold your creation.
If painting your vessel is on the agenda, ensure it’s fully cured. This prevents the paint from blocking the water dissipation during the curing process.
For adding labels, whether candle labels or transfer labels, patience is key. Wait for the vessel to be fully cured before applying them. If you want to guarantee the label sticks for life, you can use your sealant as a bonding agent, ensuring a long-lasting attachment.
Yes, we’re talking about life-long sticking power!
To check out Earth Safe Finishes sealer click .
Sealing
If the idea of sealing your concrete creation before adding wax or other elements caught you off guard, you’re not alone—making concrete creations can indeed be a bit overwhelming. It might look easy from the outside, but there’s more to it than meets the eye.
So, why do we need to seal our concrete creations? Concrete, especially mixes like Cement All, is highly porous. This means there are tiny spaces or holes through which liquid or air can pass. A quality sealer, like Earth Safe Finishes, becomes crucial as it protects the contents from leaking out and prevents external elements from penetrating in.
Here’s the catch: we need to let our vessels cure first. If we seal our concrete creations too early, the water trapped inside those pores can cause issues. Under certain conditions, like the heat from a burning candle, that water will try to escape, potentially causing bubbling, peeling, or even cracking.
There are various good sealers in the market, and I’ll provide a video link for you to explore the options. Personally, I prefer Earth Safe Finishes sealer because it’s specifically designed for concrete candles and is user-friendly.
Now, here’s a clever trick—after adding your foil or other embellishments, you can wrap it all up by sealing at the same time. It’s a fantastic way to achieve two goals with one concrete candle jar. Efficiency at its finest!
To view the full video on The Secrets That No One Told You About When Using Cement All click here.


Your knowledge has helped me on the attempt to make my own containers the next thing do is put out a book with ilastrations, Thank you
Love that idea!